Truss that chicken!
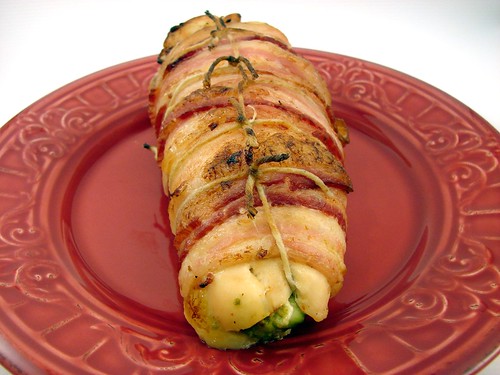
I’ve always been fascinated by trussing. It looks so… cheflike. So professional. So fancy. So out of my league! For years I avoided it like the plague. The idea of stuffing and rolling and knotting something seemed somehow out of my reach.
So why truss? To cook log-like foods evenly. Almost anytime you stuff and roll something, there’s a chance the ‘package’ will be unevenly shaped and won’t cook properly. It also keeps thing looking tidy–like bird wings. If you tie them to the body, then they don’t look like they may fly away from the platter. Finally, trussing keeps all the goodness in. Nothing oozes or slips out of the cavity. See? A handy trick, right?
One day I decided I would give it a try. The roll wasn’t all that attractive, but it did serve it’s purpose. It was good enough to commit to the process. I bought cooking twine and gave living space in my pantry. I didn’t avoid recipes simply because they required trussing.
Today I will share with you how *I* truss. It may not be the fancy Le Cordon Bleu way, but it looks good. Most importantly, it’s easy and it WORKS! Ready? Get your twine.
The traditional style for trussing uses one long piece of twine. I find it awkward to keep that piece of string going in the direction it should or I mean for it to. Instead, I tie individual pieces: cutting 1 long piece to tie it across the longest section and, depending on the size of the item in question, at least 3 shorter pieces to crisscross.
First things first. Twine. Remember that scene in Bridget Jones where she makes dinner for her friends and trusses something with blueish twine? Yeah. Make sure you use cooking twine. These will usually be made of cotton and colorless. There are also some elasticized ones, I’ve not used those, but when I buy a rotisserie chicken, that’s what’s on it. Anyway, avoid colored twine.
Second thing: After cutting the twine, soak it in water before using. Not a must-do, but the twine will darken as the meat cooks. If you soak it, it will not burn.
OK, let’s do it.
Step 1 – Once you’ve stuffed and rolled, take the longest piece of twine and slide it under the trussee. Bring it to the top, pull towards one of the ends and tie 2 knots. Make sure to pull it taut, but not too tight.

Step 2 – Crisscrossing. Take the shorter pieces, again, slide it under the roll until you reach the center. Now pull it to the top, and tie a double knot.

Step 3 – Crisscrossing. Take another piece of twine and slide it under to about 1-inch from the center tie. Pull up, double knot. Repeat this step for as many sections as you need. The chicken breast I rolled for this demonstration was about 7, maybe 8 inches long. I tied it twice on either side of the center cross-section.

Step 4 – Trimming. All that’s left now is to trim the excess twine. Use a very sharp knife or scissors for this. Trim pretty close to the knots, just not so close that you need worry about the knots coming undone.
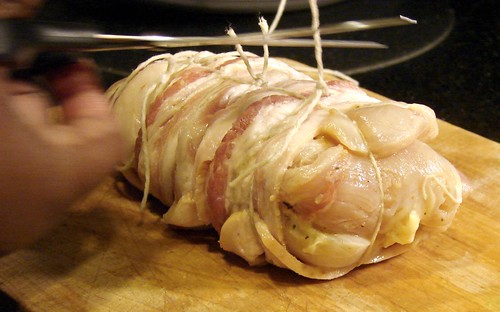
Step 5 – Done. Go roast it now.
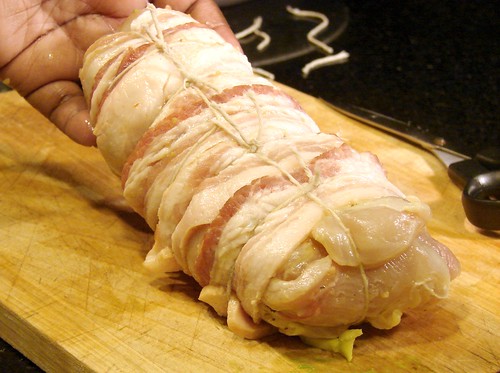
I didn’t remind you about this last week. I wasn’t feeling quite myself then. I will tell you about this week’s challenge.
It was hot. It was sexy. It was girlie. It was… lingerie!
Go on, you know you want to look.
Leftovers are like Tuesdays, inevitable. Sometimes you have a full meal left behind, that one is easy. Next day’s lunch. Other times you end up with parts of the meal. For this recipe I’m referring to the former.
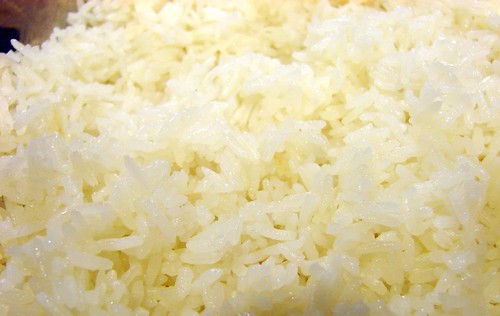
Remember that yummy ham I made? Well, we ate it for a couple of days, but it kept showing up. Add to that some cooked white rice and a new meal was born!
This time I will not give you a precise recipe. It isn’t necessary. Think about ingredients you like in fried rice, then raid your fridge and make happy. All you need is the rice, a meat, the veggies you like and soy sauce. Honestly, there’s no science to this one.

Ham Fried Rice
Cooked rice (I had about 4 cps)
Ham, chopped (about 2 cps of the protein you’ll use)
Bacon, diced (2 slices)
1 large onion, chopped
3 eggs, beaten
Scallions
Oil
Soy sauce
Garlic powder
Most veggies you like will work here
To your wok or skillet, add the bacon and cook until lightly golden. If not using bacon, add oil to the wok and go to the next step.

Add the veggies–this time I only had onions and scallions.

Add the meat/protein you’re using and cook until heated through. Remove from wok and set aside.
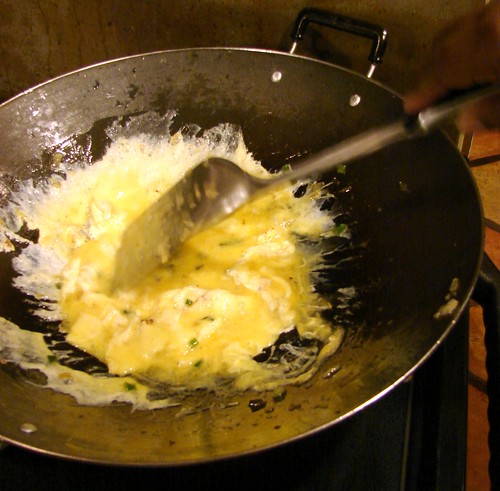
Add a few drops of oil (if needed), then add eggs. Swirl eggs around the wok, scrape them around in the same way you would make an omelette. Mix into the meat/veggie mixture and set aside.
Make sure the wok is quite hot, add 1 tbsp oil then the rice. Fry and stir constantly to coat rice well. Add soy sauce, for this amount I used about 2-3 tbsps. Stir it in and continue to cook and allow the soy sauce to evaporate.
Sprinkle some garlic powder…this is where I channel the artful BeniHanna chefs, and this step is optional. Again, make sure to stir it all in and well.

Now add the meat/veggie mixture. Stir it in and serve.

At this time I would like to direct your attention to the not so distant past. I’ve been adding recipes here for almost 3 months now. Some of you have been here from the beginning, but I’m guessing most of you have not.
I’ve mentioned before that my cooking palette is pretty diverse thanks to my mom’s influence. Most often, though, you will see a Latin-Caribbean undertone to what I prepare. Mexican touches are probably the next most common variation, then Indian and the rest of the world.
Allow me to point you back to some of my personal favorites. I hope they’ll end up on your cooking playlist. Let’s take a look.
This one is not so much about cooking, but rather about having a few things handy and ready beforehand. I ALWAYS have both of these items at hand. Crushed garlic & habanero paste.
Hubby’s favorite dish. Or at least one of the top 5.

Shrimp is one of those things I can eat whenever. This is my absolute favorite way to prepare it.

And you can’t have shrimp al ajillo without good rice.

And because I love legumes, I bring you lentils!

I’m a pork lover, I probably cook some cut of it at least 3-4 times a month.

The last 2 recipes are very dear to my heart, but may fall within the ‘acquired taste’ realm. Nonetheless, to love me is to know what I love.
Here you have a delicious bowl of mondongo.

And behind door #2, Corvina frita, baby!

I hope you enjoyed this little trip down memory lane.
Cookingly yours,
Anamaris
Yep. This is my 100th post. This came around FAST. I didn’t know what I wanted this post to be about. I toyed with the idea of making it a Best of, or maybe a My Fave recipes. In the end, I decided to go back to the beginning. The beginning of this blogging adventure.
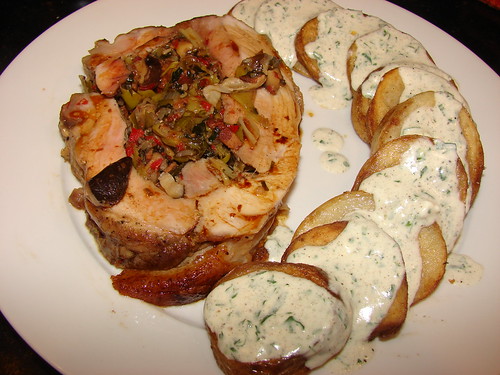
Once upon a time… No, I won’t do that to you. I will tell you it was about 6 or so months ago. I had bought a bunch of leeks, a new ingredient for me, and decided I would stuff a pork shoulder with them. My plan was to debone the shoulder, stuff it and tie it–also a first for me. I was nervous about tackling all these firsts and I started to think about others who may feel the same way about cooking in general.
I often tell friends not to be afraid to try cooking. I truly believe anyone can cook, all you need is a desire to. So as I stared at that shoulder and the leeks, I began to wonder how I could hold someone’s hand through a similar moment. I began wondering if I could somehow provide support, or share ideas, could I inspire someone? I know, a bit grandiose, but in my heart of hearts that’s what I hoped for.
So, on I went deboning that shoulder and chopping those leeks and trussing that baby up. And I giggled at my deformed shoulder roll thing. And I licked my fingers after tasting the leeks. And I smiled when Linz mmm’d and aaaa’d. And I thought, yeah, I want someone else to feel this way. And, so it began.

I hope you enjoy the recipe as much as we did. And thanks for reading and, hopefully, eating with us.
Roasted Pork with Leeks
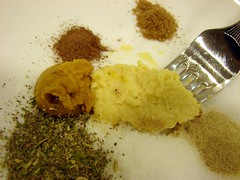 1 5-7lb Pork shoulder roast
For the rub:
4 cloves garlic, crushed
1 tbsp sea salt
2 tbsp English mustard
1 tsp cumin
2 tsp dry oregano
1 tsp allspice
1 tsp coriander
2 tbsp olive oil
If you’ve started out with a bone-in shoulder, you’ll need to remove the bone. You could also use pork belly for this and avoid dealing with a bone.
 To debone the shoulder, I started out by cutting straight through the roast, cutting down until I hit the bone. I didn’t take step-by-step pictures of this part, how about you go here for those. When done, set it aside while you prepare the rub.
For the rub, mix all the ingredients listed above, making them into a paste. Liberally rub it all over the roast on both sides. Set it aside while you prepare the filling.
For the filling:
1 bunch of leeks, chopped
1 cp mushrooms, chopped (I used crimini)
2 shallots, chopped
1/2 cp Italian parsley, chopped
1 red pepper, chopped
2 tbsp olive oil

In a medium skillet, heat the oil and add the shallots and pepper, after a couple of minutes add the mushrooms and leeks. Once the leeks begin to soften, add the parsley. You can season lightly with salt & pepper. Allow it cool for a few minutes before filling the roast.
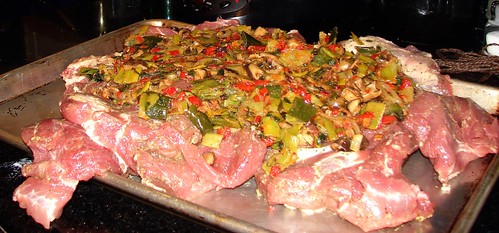
Preheat oven to 400° and get some cooking twine ready. Now for the antsy part… Spread the roast out on your counter. Top it with the leeks filling. Bring the sides of the roast together and truss it with the twine. The one thing you want to achieve, is to make the it as even as possible. That way it will cook at the same rate. Remember to soak the twine before trussing.

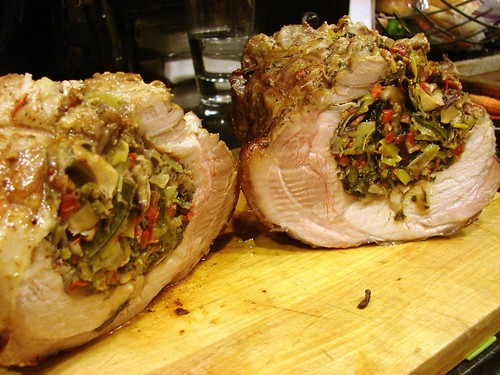
Once you’ve tied it up, place the roast on a roasting rack with a pan underneath to catch all the yummy cooking juices. Pop it in the oven for 15 minutes, just long enough to get some nice color on it. Then lower the oven’s temperature to 350° and roast until the internal temperature reaches 170° to 175° (about 35-40 minutes per pound).

Remove it from the oven and allow it to rest for at least 10 minutes before removing the twine and slicing it. You can serve it with the pan juices or make a gravy with them.
Cookingly yours,
Anamaris
Remember the very first Top Chef It Yourself Challenge? Well, it’s time to pick a top recipe from all the top recipes submitted. We would like your help!
Tell us which one of the delicious recipes you would most like to try. The winning recipe will be featured Wednesday.
Now get in here and vote!
Sorry, polls are now closed. Stay tuned for the winning entry.
[polldaddy poll=2582236]

Aren’t they just gorgeous? I went crazy at HomeGoods and picked up plates in various colors, shapes and sizes. Because why? Because I want to mix it up when I take pictures of zee food, that’s why.
That little green one on the top, my favorite, will be coming right up. Keep an eye out for it.
(soon) Cookingly yours,
Anamaris

And that’s hard for me to do. But I am. I promise.
I e-met JB while participating in one of NaBloPoMo comment challenges. Her blog encourages you to focus on the good and beautiful. The first post that caught my eye was about finding the beauty in the mundane, to take the time to enjoy the little things. I don’t always comment, but I do try to read her posts every week. They serve as reminder to slow down and enjoy the moment. To leave my anal ways behind, or at least, to take a break from them.
In any case, JB has just started featuring her favorite bloggers. She calls it Fridays for Friends, guess who was featured today? Uh huh! Me, Moi, Yo! I’m so embarrassingly excited about it. She asked me to answer a few questions. She asked me to be brief. I wasn’t. But that’s just like me, no?
Anyhow, you’ll have to go to her blog to read the feature, and you know you don’t want to miss it!

Jen, from The Leftover Queen, has a monthly contest featuring 3 predetermined ingredients. She calls it the Royal Foodie Joust. For February, the ingredients are fish, coconut milk and nutmeg. I simply had to enter. Those are 3 of my favorite ingredients.
Coconut milk is ever present in Panamanian & Caribbean cuisine, besides that, I LOVE the flavor it imparts to food.
Fish–well, I come from a country which name means ‘abundance of fish’. Need I say more?
Nutmeg. I love its smoky, sweet aroma and taste.
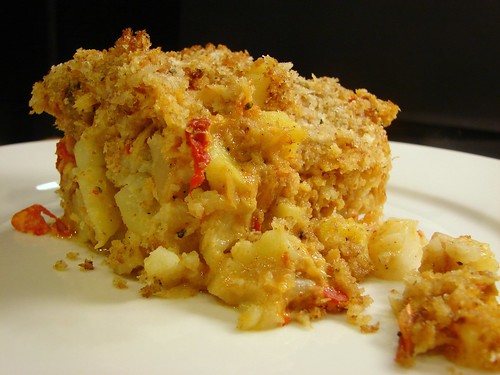
There’s a dish my mom prepares, a casserole of sorts. She recently reminded me of it and I’ve had it on my to do list for a few months. Turns out, I’ll be using my mom’s basic dish, then tweaking it to fit the joust.
Her dish calls for bacalao (salted dry cod), potatoes and a béchamel sauce. Can you guess? Instead of béchamel, I’m using coconut milk, yeah baby, yeah! So, without further, you know, babbling, here’s the recipe.
Bacalao Casserole
1 lb bacalao (dry salt cod)
1 onion, sliced
1 red pepper, chopped
3 slices bacon, chopped
2 cloves garlic, crushed
1 tsp habanero sauce (optional)
1/4 cp white wine
1 cp coconut milk
1 cp water
1/2 tsp nutmeg
6 potatoes, peeled and cubed
2 slices bacon, chopped
2 tbsp olive oil, approx
1 tbsp butter
1/2 cp panko crumbs
1/2 cp bread crumbs
First you need to reconstitute the bacalao. Reconstitute is a fancy way of saying hydrate. Put the cod in a bowl and add boiling water, let it seep for about 15 minutes. Drain water and repeat the process once more or until the fish feels pliable. Drain and shred the fish. Set aside.

I weighed the contents of a 1lb container, it only weighed 12ozs
In a medium skillet, fry the bacon over medium-high heat just enough to render the fat and give it a bit of color. Add the onion and cook until translucent, then add the red pepper. Cook until softened. Add the bacalao, garlic and habanero sauce, stir until all the ingredients are incorporated.
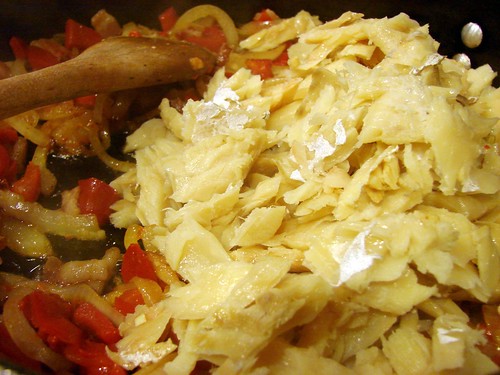
Add the wine and cook it down until evaporated, this will only take a minute or two since the pan is quite hot. Once the wine has evaporated, add the coconut milk, water and nutmeg. Stir and bring it to a boil, then turn down the temperature to a simmer and cook covered for about 20 minutes. The flavor of the coconut milk intensifies overnight, so I did this part of the recipe the day before I served the dish.

Preheat oven to 375°.
Lightly brown the bacon in a skillet, remove and drain. You want your potatoes cubed pretty small. Add enough oil to the skillet to be able to brown the potatoes. Fry the potatoes in 2 batches. Once you have browned the first batch, transfer them to an ovenproof dish. Finish the rest of the potatoes, then mix in the bacon right into the baking dish.
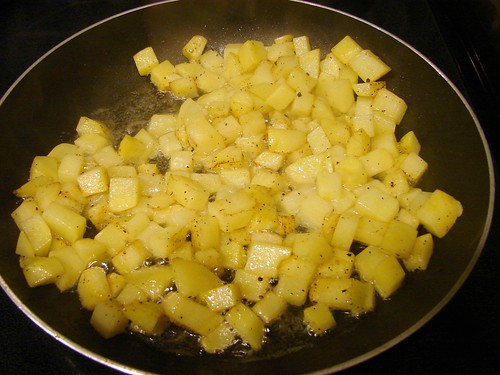
In the same skillet, melt the butter and add the breadcrumbs, stir them frequently until lightly browned. Set aside.
Add the bacalao mixture over the potatoes, then top the potatoes with the breadcrumbs. Bake for 20 to 30 minutes. Allow it to sit for 10 minutes before serving. This would go beautifully with tajadas.

By the way, come check out the other entries and vote for me!!! Rock the Vote!
That’s it. Enjoy!
Cookingly yours,
Anamaris
I had put it off as long as possible. I had to remind myself of the advice I give my friends: ‘just try it, you may be surprised by the results’. So I did. I still have a hard time believing it. I measured. I mixed. I kneaded. I baked ciabatta and won! I mean, the last time I attempted making bread was eons ago and quite unsuccessfully.
My mom makes awesome bread. But for me, it had never worked. The yeast taste was too strong. The water I used to bloom the yeast was either too hot or too cold. I’d end up with heavy little lumps of dough and a feeling of failure. But as I’ve lurked around the Bread Baker’s Apprentice challenge pages, I kept telling myself maybe, just maybe I could try again.

First off, I read and reread Nicole’s recipe on Pinch My Salt. Her ciabatta looked so…, so… seductive. I had to try it. She used the poolish method. After I was done making jokes, I looked it up and realized that a poolish is nothing more than a dough starter, like is used for sourdough; how foolish did I feel (heh, I couldn’t help myself). I also think this might be the main reason I didn’t end up with that odd yeasty taste from past attempts. I think the poolish, since the recommendation is to make it a day ahead, allows the yeast to relax a bit and get rid of its uppity attitude.
For the poolish, I was to mix:
2-1/2 cps bread flour
1-1/2 cps warm water (from the tap)
1/4 tsp dry yeast
I first stirred in the yeast into the water and allowed it to hang out for 10 minutes or so. Then it all went into my trusty Kitchen Aid for a whirl until it was smooth and looked like this.
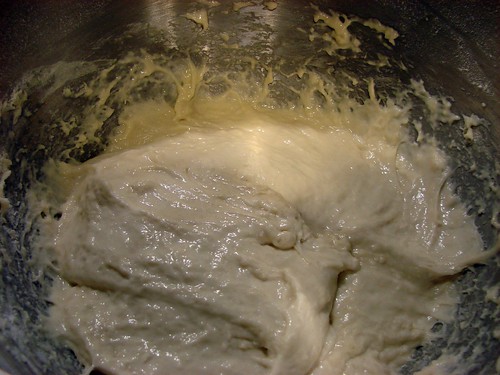
I covered it with plastic and left it on the counter for HOURS, and watched it bubble up and grow. Eventually it goes into the fridge overnight.
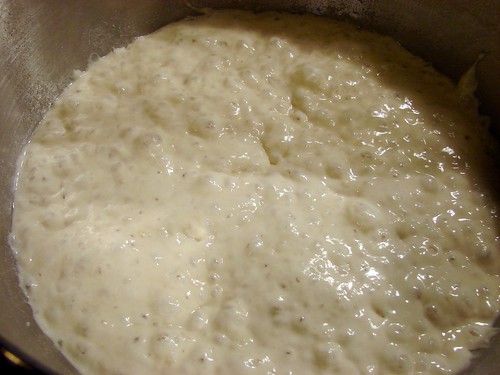
The next day, remove the poolish from the fridge at least an hour before you mix the ciabatta. See? It grew even more!
To the Kitchen Aid bowl I added:
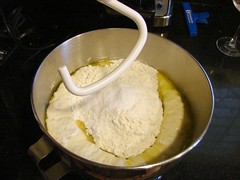 3 cps bread flour
2 tsps dry yeast
1-3/4 tsp salt (you’ll need more if using sea salt)
4 tbsps extra virgin olive oil
1/2 to 3/4 cp warm water
Then dropped the poolish right on top and let Kitchen Aid have its way with it. I started out with 1/2 cp of water, and added more to get to a wet and sticky dough. I allowed the mixer to do the heavy lifting. I beat the dough until it looked smooth and silky.
Ciabatta dough should be wet and sticky, you will not knead in any flour. Once the dough looked smooth, I floured my counter with a LOT of flour and spread it out. I then dropped the dough right in the center of the floor pool and, following Nicole’s instructions, I shaped it into a triangle… of sorts.
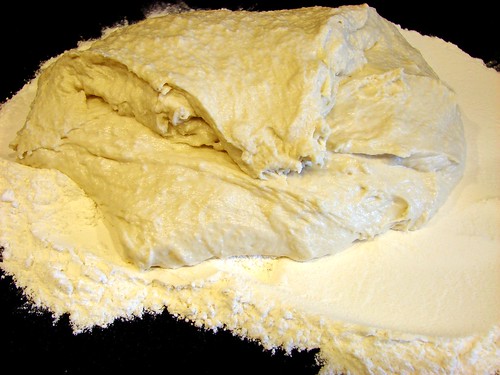
Cover it with plastic and let it rest for about 10-15 minutes. At the end of that time, the dough is ready to begin the stretching dance. Aside: this dough feels incredible! It feels cool and fluffy, like doughy cotton balls.
Anyway, stretch out the sides of the triangle. I stretched it out to about 2-feet wide. Remember there’s a lot of flour around the dough, you’ll want to get rid of some of the excess. I used a brush to get rid of the flour on top.
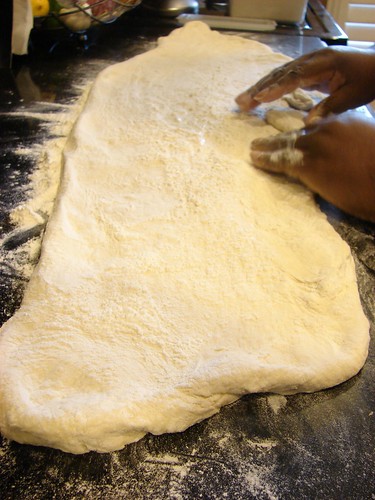
Next, fold it into thirds. Take one end and fold it over to about the center, brush off the excess flour, then take the other end and fold it over the top of the first fold. Now, cover it with plastic wrap and let it rest for 30 minutes. Walk away.

I tucked the plastic in to make sure the dough didn't dry up
One more time. Stretch it out, brush off the excess flour, fold into thirds. Cover with plastic wrap and this time, let it rest for 90 minutes.
During this period, you should get things ready to slice the dough into  loaves and set them onto a couche to rest some more. I am not a baker, so I don’t own a fancy couche. Instead, I enlisted a few kitchen towels to do the trick.
I lined up 2 towels, then took a third one and pooled it to create a rim on one end. Left a smooth space about 4-inches wide and made another ripple. I used 2 towels to be able to create 3 spaces with rims on either side. Sprinkle flour on each space.
I also took a baking sheet and poured coarse cornmeal on the back side of it.  This will serve as your traveling suitcase for the loaves. This way you can slide them onto your preheated baking stone awaiting in the oven.
At the end of the 90 minutes, divide the dough into thirds. Stretch out each third, fold it into thirds as you did before and place the folded dough into one of the spaces of your makeshift couche. Once you have all 3 pieces tucked into their spot, cover with plastic again and allow it to rest while you get the oven going.
Hopefully you have a baking stone, if you do, put it in the oven on the middle rack. Preheat the oven to 500, it’ll take a bit longer because of the stone. You will also want to put a pan on the bottom. Ciabatta likes steam while baking, it likes to pretend it’s in the sauna room of a fancy spa–so let it. Heat up some water and keep it at a simmer. You will add this to the pan at  the bottom to get things hot & steamy up in der’. Nicole also recommended using a spray bottle to wet the sides of the oven while baking. Get all your gadgets ready.
Once the oven reaches temperature, it’s time to move the loaves from the cozy couche to the cornmealed pan. As you remove the loaves from the couche, stretch them out and drop them onto the pan. I have a 16-inch or so baking stone, so I was only able to fit 2 loaves at a time. Now, get ready, the next part goes kinda fast.
Slide the loaves off the back of the pan and onto the stone. You may need to help them along, but if you put enough cornmeal under it, it will slide quite easily. Push it all the way back into the oven. Then add enough water to that pan at the bottom, I added about 2 cps of already hot water. STEAM! Hurry, close the oven.
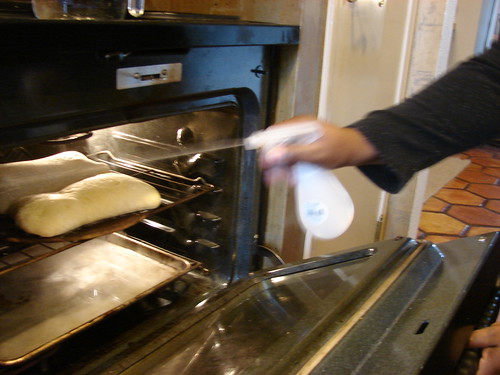
Give it a couple of minutes, then grab your spray bottle and spray the sides of the oven. More STEAM. Close the door. Wait about 30 seconds and spray again. Wait 30 seconds and repeat. Now turn down the temperature to 450. I missed this part on Nicole’s post, so my loaves were a bit too dark. They looked like my children might have. They will bake for 15-20 minutes. And you’ll have awesome bread. Hope you left some butter out.
Here’s a closeup:
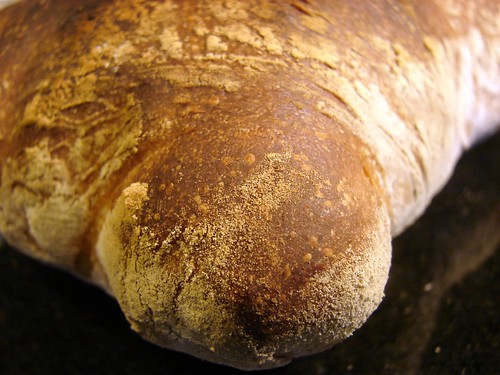
Now for the bragging part. I was so nervous about this. My ciabatta had holes, BABY!
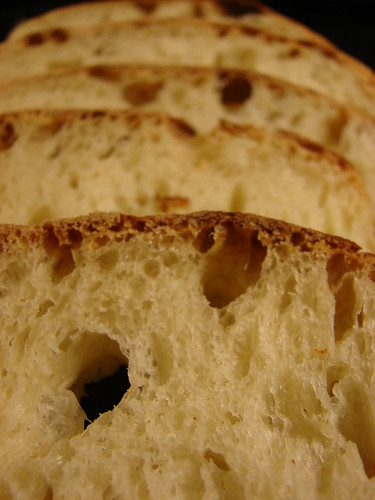
But wait, there’s more…

Before I let you go, I have to thank my hubbz for the action shots. He does a really good job with those, doesn’t he?
Cookingly (and bakingly) yours,
Anamaris


 To debone the shoulder, I started out by cutting straight through the roast, cutting down until I hit the bone. I didn’t take step-by-step pictures of this part, how about you go


 This will serve as your traveling suitcase for the loaves. This way you can slide them onto your preheated baking stone awaiting in the oven.


